


Safari, Apple’s default web browser for macOS, offers several ways to restore your previous browsing session. This feature can be a lifesaver if you accidentally close your browser, experience a crash, or if your Mac unexpectedly shuts down. If you’ve found yourself stuck in a similar situation, don’t fret! I’ve rounded up multiple methods to recover your previous browsing session in Safari on Mac, ranging from simple built-in features to advanced techniques for tech-savvy users.
Automatic restoration
By default, Safari is configured to reopen windows from your last session when you launch the browser. This automatic restoration feature ensures that you can pick up right where you left off without any additional steps. I’d just like to point out that if you had the option disabled, you will not be able to retroactively get back the tabs after closing Safari, at least using this method.
How to enable automatic restoration:
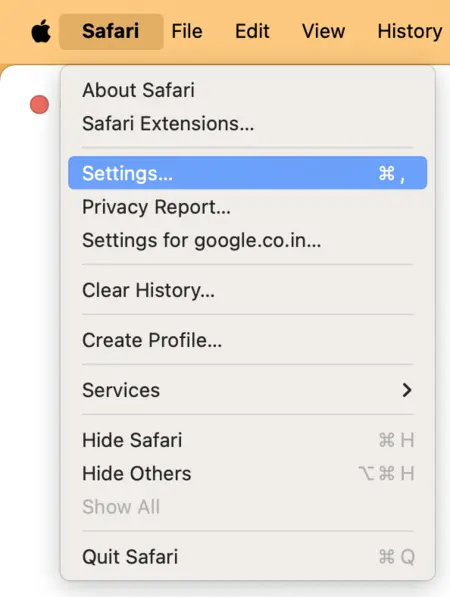
- Open Safari.
- Click on “Safari” in the top menu bar.
- Select “Settings” (or “Preferences” in older versions).
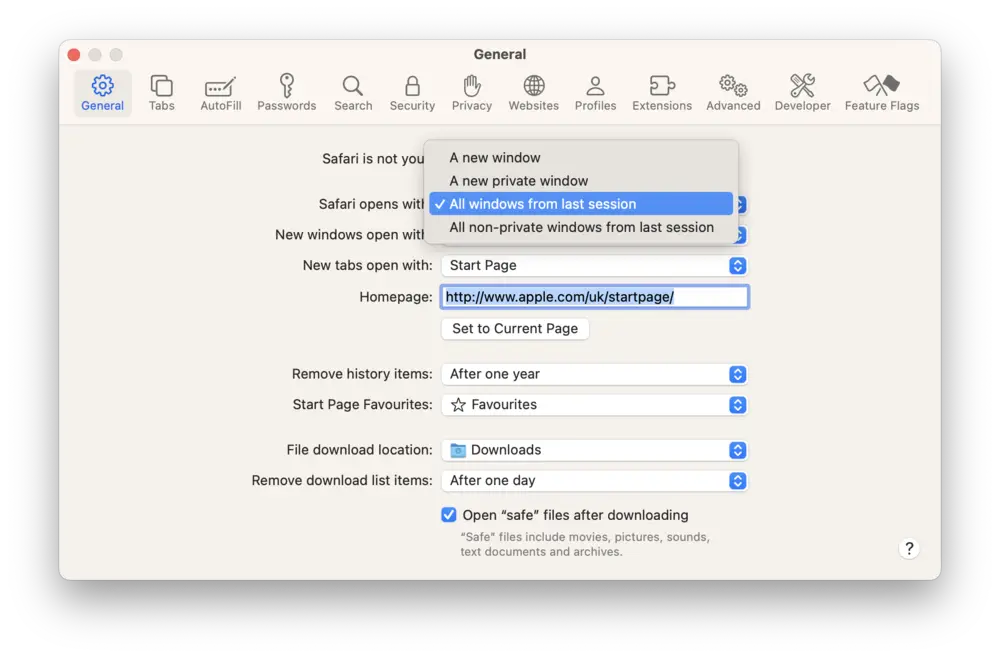
- Navigate to the “General” tab.
- Use the dropdown menu besides the “Safari opens with” option and select “All windows from last session” or “All non-private windows from last session”.
With this setting enabled, Safari will automatically restore your previous browsing session each time you launch the browser. This includes all open tabs and windows from your last session.
Manual restoration
If automatic restoration doesn’t occur or if you’ve disabled the feature, you can manually restore your previous session using Safari’s built-in history function.
Steps for manual restoration:
- Open Safari.
- Click on “History” in the top menu bar.
- Select “Reopen All Windows from Last Session”.

This action will restore all the tabs and windows from your most recent browsing session. It’s particularly useful if you’ve closed Safari and want to recover your previous work without relying on the automatic restoration feature.
Recovering from Safari crash
If Safari crashes unexpectedly, it often provides an option to restore your session upon reopening. This built-in crash recovery feature can save you from losing important work or research.
How to recover from a Safari crash:
- If Safari crashes, wait for it to close completely
- Relaunch Safari
- When prompted, click “Restore” to recover your previous session
- If you don’t see the restore prompt, you can try the manual restoration method described earlier (History > Reopen All Windows from Last Session).
Restoring tabs from a specific date
While this isn’t exactly a one-tap way to get back your previous browsing session, Safari does keep a record of your browsing history and you can then manually check and restore the tabs your wish to get back.
How to restore from a specific date:
- Open Safari.
- Click on “History” in the top menu bar.
- Select “Show All History” (or use the keyboard shortcut Command + Y).
- In the history window, navigate to the desired date in the sidebar.

- Now simply check the links that were recorded and double-click on the link/tab that you wish to open.
This method allows you to recover tabs from specific days, which can be invaluable if you’re trying to find information you were working on at a particular time.
Using Time Machine
If you’re unable to restore your session using Safari’s built-in methods, you can try using Time Machine, macOS’s built-in backup system. This approach can be particularly useful if you’ve lost your session due to a system crash or data corruption.
Steps to restore Safari data using Time Machine:
- Connect your Time Machine backup drive to your Mac.
- Click on the Time Machine icon in the menu bar and select “Enter Time Machine” (If the icon isn’t visible, go to System Settings > Time Machine and enable “Show Time Machine in menu bar”).
- Navigate to your user folder, then to Library > Safari.
- Look for files like “LastSession.plist” and “LastTabs.plist”.
- Select the version of these files from the date and time you want to restore.
- Click “Restore” to replace the current files with the selected versions.
Please note that this will only work if you have Time Machine enabled on your Mac beforehand. In case Time Machine wasn’t enabled, this won’t help restore your browsing session.
Using Terminal
For tech-savvy users comfortable with command-line interfaces, Terminal offers a way to access and potentially recover Safari’s saved state files. This method can be particularly useful when other recovery options fail.
Steps for using Terminal to recover Safari sessions:
- Open Terminal (found in Applications > Utilities)
- Navigate to Safari’s saved state directory by typing:
~/Library/Safari/
- View the contents of the LastSession.plist file:
plutil -p LastSession.plist
- Create a backup of the file:
cp LastSession.plist LastSession.plist.backup
- If needed, edit the file using a command-line text editor like nano:
nano LastSession.plist- (Be extremely cautious when editing this file, as incorrect changes can corrupt your Safari data)
- To force Safari to use a specific session file:
- Quit Safari
- In Terminal, move the desired session file:
mv DesiredSession.plist ~/Library/Safari/LastSession.plist
- Relaunch Safari
- For extensive debugging, you can use the defaults command to read Safari’s state:
defaults read com.apple.Safari
Remember, manipulating these files directly carries risks. Always back up your data before attempting these advanced methods, and proceed with caution. Furthermore, this trick won’t work if Safari overwrites the browsing session data. Although, you might find success if you pair it up with the Time Machine method.
Third-party extensions
Unfortunately, if you’ve already lost your previous browsing session, third-party extensions won’t do be of help. However, these extensions will help prevent a similar situation in the future. Some extensions automatically back up your browsing sessions, allowing you to get back to what you were working on with just a click.
Popular Safari extensions for session management:
- SessionRestore for Safari: Allows you to save and restore multiple named sessions.
- Tab Space: Provides advanced tab management and session saving features.
- OneTab: Converts all open tabs into a list, saving memory and allowing easy restoration.
Once installed, these extensions typically add icons to Safari’s toolbar, allowing you to save, manage, and restore sessions with greater flexibility than Safari’s built-in features.
Conclusion
Restoring your previous browsing session in Safari on Mac doesn’t have to be a daunting task. With the methods outlined in this guide, you have multiple options at your disposal, from simple built-in features to advanced techniques for power users. By understanding and utilizing these methods, you can ensure that you never lose important tabs or research progress, even in the face of unexpected browser closures or system crashes.
Remember to regularly back up your important data and consider using iCloud or third-party extensions for additional peace of mind. If you found this article useful, please consider tapping that like button. We also have detailed guides on how to get back your previous browsing session on Firefox and Google Chrome that you can check out.
TechIssuesToday primarily focuses on publishing 'breaking' or 'exclusive' tech news. This means, we are usually the first news website on the whole Internet to highlight the topics we cover daily. So far, our stories have been picked up by many mainstream technology publications like The Verge, Macrumors, Forbes, etc. To know more, head here.


Dwayne Cubbins
1475 Posts
For nearly a decade, I've been deciphering the complexities of the tech world, with a particular passion for helping users navigate the ever-changing tech landscape. From crafting in-depth guides that unlock your phone's hidden potential to uncovering and explaining the latest bugs and glitches, I make sure you get the most out of your devices. And yes, you might occasionally find me ranting about some truly frustrating tech mishaps.

